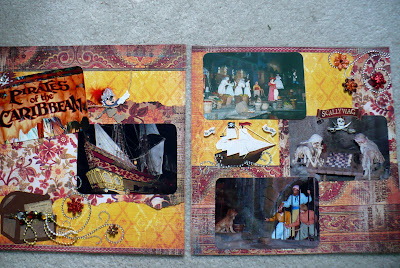
Anyone who knows me knows that besides Fairies my favorite thing on earth is anything Disney. I think out of everything I've kept up with it's been my Disney scrapbooks more than any other project. (Sorry kids!)
The pirate ship is a Jolee's sticker.
I used Life is a Beach Cricut cartridge for the chest and various strings of pearls and gems. The paper is a few years old from Daisy D's. (Not sure what happened to them but I used to love their paper!) Something I recently discovered, (slow learner!), is that if you click on the pictures it will enlarge them so you can see them better. For some reason I can't seem to get them to post as large as I would like. Thanks for becoming a follower!
Wednesday, March 21, 2012
MIA is Here
Just wanted to announce that my 2nd grand daughter, (and 5th grandchild!) was born last Saturday, March 10. My daugher, Allison, had an amazing quick delivery for her first born. We are in love!
Thursday, March 15, 2012
SNOW CROP
In early February I went to the first crop I've been too in years. I was really excited as my awesome cousin who lives in Maine flew down to come too. ( She is mostly a stamper and has finally pulled me into yet another obsession which I've been trying to avoid for years!) The Snow Crop was in Gettysburg, PA at the Wyndam hotel which was beautiful and the food was actually good!
I had bought so many Asian papers thinking they would be perfect for China and Japan's Pavillion's but somehow none of them thrilled me with my pictures. I ended up using Basic Grey's Lily Kate, Porcelain, and Offbeat.
I cut out some of the orange flowers from one of the papers and glued them here and there on the background paper to bring in some of the orangey-red from the Jolee's kimono sticker and the Koi in the pond. The fronds are from K&Co.
I put punched some corners for the pictures but it wasn't enough so I took some distress ink in Wild Honey and with my finger, (bad idea if you don't want to look like you have jaundiced fingers!), kind of smeared it around the pictures. It looks way better in person!
Here is the first page I got done:
It was definitely key that I made up page kits in advance. I'm a very slow scrapper as it is so having pre picked out most of what I wanted for each set of pictures eliminated the hardest part.
I scrap lifted lots of elements on the American Pavillion layout from various pages I had seen on Two Peas In A Bucket and Scrapbook.com layout galleries.
You can't really see it all that well but I have little star silver buttons I've had in my stash for ages on every other star in the scallop. I loved how that came out! The papers are all from Bo Bunny. I cut out various elements from papers and mixed and matched them. The bling is all from Michael's.
I'm sorry all of these pictures aren't too great - I am still learning my new Canon Rebel and indoor pictures are a challenge!
I cut out some of the orange flowers from one of the papers and glued them here and there on the background paper to bring in some of the orangey-red from the Jolee's kimono sticker and the Koi in the pond. The fronds are from K&Co.
I put punched some corners for the pictures but it wasn't enough so I took some distress ink in Wild Honey and with my finger, (bad idea if you don't want to look like you have jaundiced fingers!), kind of smeared it around the pictures. It looks way better in person!
Japan is Cricut Jasmine cartridge with shadow. I then put gold stickles lightly on the letter part. Always have to have my bling!
In the same package with the K&Co fronds were these pretty intricate wide borders that were perfect - but not the right color. It wasn't until I turned one over and discovered it was white on one side that all those tutorials I've been watching clicked into play. I used some Tattered Angels spray to make it the color I needed and then used Distress ink to shadow it and was so excited! I then took the pink flowers off of a Jolee's flowering tree branch and put them on the border as well as a few on the kimono just to pull it all together.
I am thinking perhaps I should change the template to less busy - what do you think?
Thursday, March 8, 2012
Mia's Letters
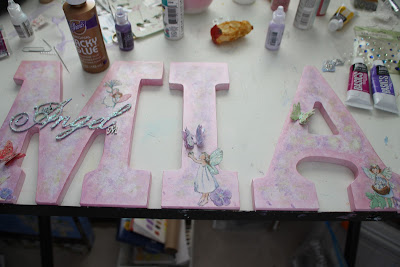
This was so much fun to do! These came already painted white from Michael's so no finishing needed. I knew I wanted to incorporate the pink, purple, and the bright green of Mia's bedroom but wasn't sure how. I pulled out some Martha Stewart Pearl Acrylic Paints in those colors and I accidentaly dripped some pink paint on the A and when I used a paper towel to quickly wipe it off I loved the blotch it left! So I basically "sponge" painted them with paper towels. After I got the color on I put a heavier edge of pink around each letter to highlight them a little more for when they would be up on her purple walls.
The paint was dry very quickly and a while ago I had already bought some fabric with a Fairy pattern on it. (Of course I had to buy it despite the fact that I don't sew. It had FAIRY'S on it!) I wasn't happy with wrapping the material around the letter so I started cutting the Fairy's themselves out and laying them on the letter's.
It was just what I wanted! No project I do would be complete without some bling so I used Crystal stickles on the fairy wings and flower centers and mod podged all of the fabric pieces onto the letters. Next I went thru my bits and pieces of chipboard and grabbed this Little Angel one which I had ordered from Dusty Attic. (If you don't already know about them they are in the U.K.
First I lightly covered it with Gesso to change it to a faint white. Then I found some glitter glaze I had bought ages ago and coated it with that. Once dry I coated it again and then lightly dipped it into some white glitter flakes I had poured into a pile. I loved the feathery look!
I also had a little letter M charm that I glued on. The butterflies are from a Martha Stewart Punch which is very cool as it punches three different patterns allowing you to layer them with wings upright. For a finishing touch I added a little purple bow to the "A". The best part about this whole project was that Allison and Andre loved it and got them hung up!
Subscribe to:
Posts (Atom)


